Still got to get people and goods moving without blowing the budget – even in unlimited money!
A recap from Traffic and Transit Optimisation Part 1 #citiesskylines2 – Neo South Auckland:
From 50,000 population to 73,000 by the start Part 1, to 80,000 by the end of Part 2 and onto 85,000 by the end of Part Three in this series, it shows how quick a city can grow even inside its own existing footprint (intensification).
Consequently as a city intensifies as Neo South Auckland currently is through upzoning (which the game makes much easier than Cities Skylines 1) what was infrastructure surpluses especially with transport assets quickly get absorbed and become infrastructure deficits!
Meaning bus lines and intersections can get clogged by general traffic movements fouling out the system particularly the transit system that needs to move ever increasing ampounts of people.
Optimisation Programe, quick wins for big gains
Roll on the review and optimisation program to see where and what is going well, and what might need a bit of a touch up before going all out of mega upgrades such as replacing bus lines with tram lines which I initially planned to do. In the end if you can do some relatively quick and cheap wins through some quick optimisation programs like intersection upgrades and changing around bus lane placements which leads to a bus line flowing more efficiently (thus able to carry more people) before resorting to going to trams then you being fiscally prudent.
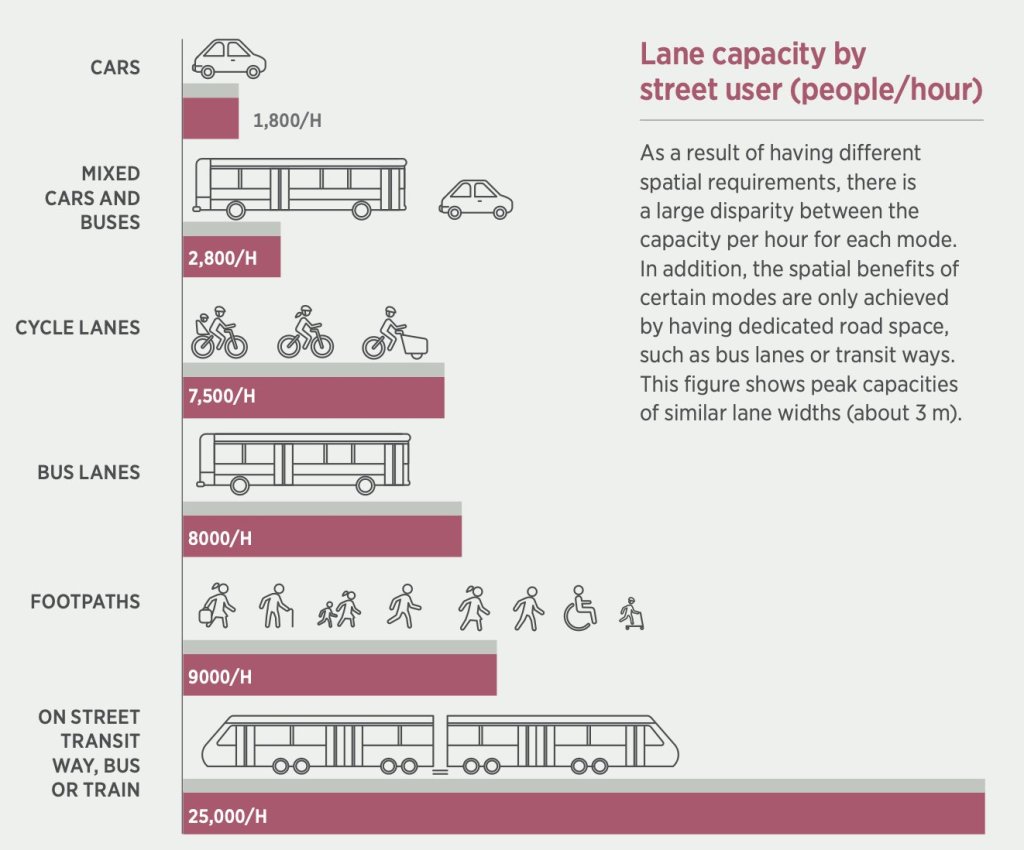
The graphic below from Auckland Transport shows how many people a lane can move depending on mode type in real life cities. The same principle applies in Cities Skylines 2, and why we optimise then upgrade the systems!
The video below is the secondof three parts as I continue optimisation program before taking a ride on Bus Lane 4, seeing some crazy as accidents, and finally an introduction of the City Centre, Hamilton, and the new Metropolitan Centre over the rivers. Oh and we might have found a bug too!
Traffic and Transit Optimisation Part 2 #citiesskylines2 – Neo South Auckland FULL VIDEO
Chapters
- 00:00 Part One Recap
- 00:02:00 Resuming the Optimisation
- 00:15:00 Riding Bus Line 4 post optimisation
- 00:21:40 Parking Woes
- 00:23:09 Back to Riding Bus Line 4
- 00:25:31 More Optimisation
- 00:26:25 First Accident
- 00:29:00 MOAR OPTIMISATION
- 00:35:30 One More Lane Shall Fix It?
- 00:38:40 All is working well?
- 00:41:00 Looking at Traffic Post Optimisation
- 00:42:00 Second Accident!
- 00:45:30 Zoning again
- 00:46:13 Checking the Stats
- 00:47:30 Bus Line 11 and 12
- 00:50:00 Introducing the City Centre
- 00:52:00 We found a bug!
Bus Line 4 and Bus Line 5 were the first transit routes to undergo the optimisation program. Bus Lines 11 and 12 are next and will be covered in Part 3.
Coming up in the series finale – Part 3
In the final of this three part series I will be covering:
- Why the Optimisation Program vs large scale infrastructure upgrades. That is what we are trying to achieve in both the short and long terms
- Does one more lane ever fix it?
- Mode efficiency
- And moving a troublesome signature residential building

